


Writer: Helena Bergström
Oh no, water leak in the motorhome! That is not what you want to experience! We've been living with this for a few weeks and really struggled to find the fault, and to fix it! Now we think we've finally found the water leak and managed to plug it!
 Tweet
 Share
 Share
 Pin
 Share
 Share
Table of contents
Oh no! A water leak in the motorhome!
It started when we realised that the floor was wet in front of the sofa in the motorhome. The campervan was probably tilted slightly forwards. Peter, who has worked in the construction industry for a long time, says that a two-degree slope is enough for the water to move in a certain direction.
Another day, when the campervan was probably tilted back a little - the floor by the kitchen was wet. Oh no, a water leak in the motorhome!
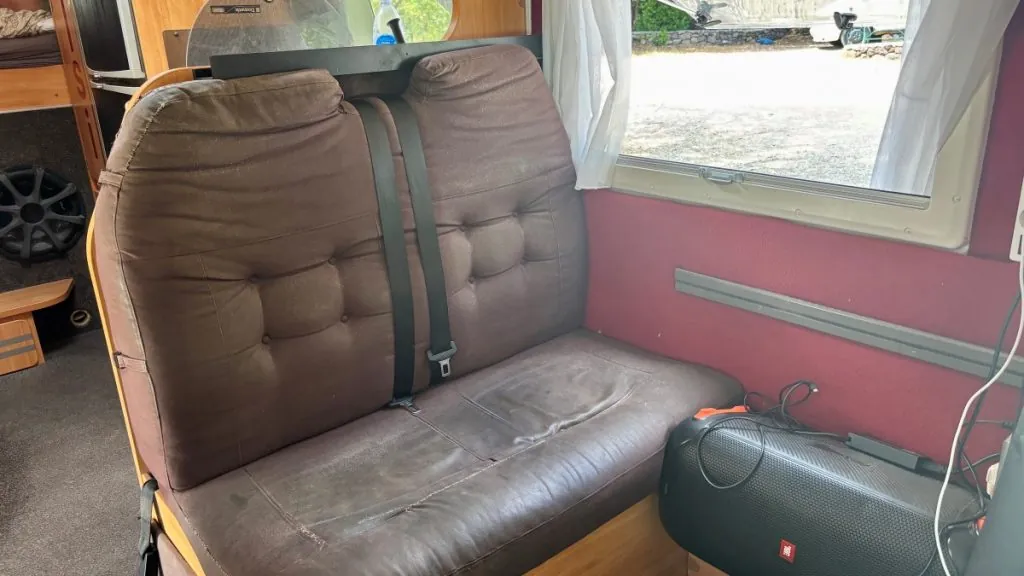
It turned out that the leak was quite serious. Water had also made its way down under the campervan and caused the wood to rot in a limited small area around the fresh water outlet. We will need to repair and strengthen this - but first we need to find the source of the water leak and put an end to the misery!

Troubleshooting and testing - Where is the leak?
When you have a water leak in a motorhome, it's not always easy to know where the leak is. There are many sources of water, and water can find its way through the vehicle in the most wonderful ways. Some options:
- Pipe fittings in kitchen or bathroom
- Grey water tank
- Waterborne heating
- Fresh water tank
- Rainwater
The leak appeared during a downpour, so at first we thought it was rainwater getting in somewhere. Then this didn't seem to be the case at all... Time to start troubleshooting in earnest!
Peter opened every cupboard and door to find something wet. He looked and looked, but it was dry as a bone everywhere - under the sink, in the cupboards, under the cupboards... Not a trace of moisture!


To find the source of the leak, he placed paper towels in lots of places around pipes and under hatches. If any piece of paper gets wet - you know you're on to the leak! But no, every single piece of paper remained 100 per cent dry...

It must be the fresh water tank that is leaking!
The water pump starts when we turn on any of the taps (with a certain noise as a result!). If there was a leak after the water pump, the pressure would drop in the pipes, and the pump would switch on without opening the taps. This did not happen and we thought that the water leak must be before the pump. Could it be the fresh water tank leaking in some way?

This seemed reasonable because water was leaking around the tank - in front of the sofa, by the kitchen and under the motorhome, by the fresh water drain pipe. We decided to test it all by emptying the fresh water tank. For several days we lived without water in the tank and used only bottled water.
Now the floor was dry! It felt like we were on the right track, and we decided that the fresh water tank had to be removed and checked!

Dismantling and repairing the fresh water tank
We set aside half a day to dismantle and repair the fresh water tank. The tank had to be disconnected from the water pipe and it was also screwed down with a bunch of metal brackets. So a lot of work!


Attached to the tank are also a bunch of electrical connectors, which tell us how full the tank is. We also had to disconnect these, and now it's important to be careful to get it right when reconnecting everything! Peter's tip is to write markings in pencil, and also to take a photo.

Finally, the water tank was out, and we had the opportunity to wipe the bottom of the box clean!

Most everything under the box was dry as a bone, except around the outlet hole. It was very damp there, which gave us an indication that something might be wrong here.

We lifted out the water tank, put it on a table and filled it with water. Now we were going to test if it was leaking anywhere! It seemed incredibly solid but from the outlet hole, where there is a small rubber seal that you can pull up to empty the tank, there was actually a little drip. Drip, drip, a little at a time ... this was probably the fault!
Vi bestämde oss för att täta utloppshålet helt. Visst kan man behöva tömma ut vattnet, inför vinterförvaring till exempel, så detta var inte helt optimalt, men vi tänkte att vi får göra det via vattenkranarna. Bara vi blir av med läckan!


Oh no! Still water leak in the motorhome ...
We reinstalled the fresh water tank, and at the first opportunity we filled it with water. So nice to have water in the taps again!
That evening, the floor of the motorhome got soaked... how was that possible? Now we were frustrated and tired, but we just had to bite the bullet. We simply had to start again!

New troubleshooting and test - Where is the leak?
We opened all the hatches and drawers again. Total chaos in the motorhome! WHERE is the water leak?

The water pump is leaking!
Suddenly, Peter realised what it could be. The lack of noise from the pump had led him to believe that the leak was before pump, but what if it was the pump itself that was leaking? We hadn't seen anything around the pump, but when he lifted it up he felt a drop of water on the underside. One drop at a time ... eventually there will be a lot of water!


Repair of the water pump
Now that we had found the water leak, we felt a big step closer to the solution. But, of course, now it was time to remove and repair the water pump. Again, Peter wants to emphasise the importance of photographing everything, so you know how to put it back together. In addition, the red and black connections must never touch each other (then there will be a short circuit) and therefore one should be taped.

When we had the water pump in our hand, it was even easier to see the water leak. In one place, where the pump is screwed together, water was dripping.

We decided to try to fix the leak by opening carefully, inserting sealing material, and tightening again. On the recommendation of a builders' merchant in Sardinia, we bought "Antiscuff paste for hydraulic fittings". Peter put some in and tightened as hard as possible.

He also sealed the outside with silicone. We don't want a single drop of water to escape!

The result: What about our water leak in the motorhome?
We have filled the water tank again and we have been using water from the taps for several days. No water on the floor! It's fantastic! We think we've stopped the water leak, which is fantastic.
We have a small limited area under the car that is moisture damaged. We will allow this to dry out properly, and then repair and strengthen it. We hope that we have now solved a problem that has been with us for a long time!

READ MORE: Equipment in the motorhome – how we fixed, furnished and remodelled it
Fler vattenläckor genom åren
Det här är faktiskt långt ifrån första gången vi har haft problem med vattenläckor i husbilen. Redan 2009 kämpade vi med läckande vattenkopplingar, och då visade det sig att problemet satt i rör som var nästan omöjliga att komma åt. Verkstaden fick bland annat ta loss ett hjul och öppna innerskärmen för att nå kopplingarna i mellangolvet. Reparationen kostade oss 8 000 kronor!

År 2016 var det dags igen. Vi vaknade en morgon och upptäckte att golvet i badrummet och gången var genomblött. Den gången var det en spricka i en koppling under toalettstolen. Peter fick skruva loss toaletten, byta kopplingen och montera ihop allt igen. Som tur var löste det problemet!

Efter alla dessa erfarenheter har vi lärt oss att vatten kan ställa till med mycket elände i en husbil – och att det inte alltid är särskilt enkelt att hitta var det kommer ifrån.
Have you experienced a water leak in your motorhome?
Have you experienced a water leak in your motorhome? How did it go? Please tell us!
You might also like:
 Winter storage of a motorhome – tips and checklist
 Installing solar panels on the motorhome - finally solar panels on the roof!
 Motorhome equipment - how we've fixed, decorated and redecorated
 New headlights for the motorhome - this is what we did!
 We tested the Bluetti Pioneer Na in a motorhome and houseboat - portable power station test!
 The cold came and everything in the motorhome froze solid... but we finally solved the problem!



 English (UK)
 Svenska
Anette Nilsson says:
What a pain in the arse. And what a struggle you had to get everything in order. I can imagine that there has been a lot of worry and despair. Water is never fun in the wrong place. Impressive that you now seem to have sorted out the error. Fingers crossed that it is now fixed and stays that way.
10 August 2025 - 9:26
Helena says:
Yes, it has been hard both with worry and a lot of different measures. Now we keep our fingers crossed! Thanks for your comment!
10 August 2025 - 18:01
Carin says:
Well done!
10 August 2025 - 10:04
Helena says:
Thank you very much! You just can't give up!!! 😉
10 August 2025 - 18:02
bmlarsreseblogg says:
Motorhome faults in general and water leaks in particular are not something you want. Pepper, pepper, we have managed to avoid leaks but a water pump in reserve is on the list of what we should get. I think many have had problems with water pumps. An advantage as a motorhome owner is probably that you are quite handy and it's really Peter so really good job and now we hope it stays tight!
10 August 2025 - 16:54
Helena says:
So, maybe it's common? And yes, it's good that Peter is handy! He has also worked a lot with water damage, in houses and such.
10 August 2025 - 18:03
BP says:
As the saying goes, the odd one out wins. Fantastic good job! And it is only to congratulate you that you have a husband who is extremely handy:-)
10 August 2025 - 20:31
Helena says:
Yes, in these situations I am extremely happy for a handy man!!!
11 August 2025 - 6:44
JoY says:
Oh what a misery you have had with the water leak which is also difficult to find. Really good job that you have got it sorted.
On one of our previous cars we discovered water on the floor, late at night when we were going to bed. Became a little half-panicked and crawled around with a flashlight. Found the fault in the garage as it was a hose connection on the cold water, which had come apart.
Have a good time now Hugs
10 August 2025 - 22:35
Helena says:
Yes, you do panic a bit when that happens! Glad you found the error that time!
11 August 2025 - 6:45
Rosor och ruiner says:
But oh what a job you got! But it had to be done, glad you got it sorted! Now we keep our fingers crossed that it continues to be dry!
Hugs Gunilla
10 August 2025 - 23:53
Helena says:
Yes, you have to deal with it somehow... Thanks for your comment!
11 August 2025 - 6:46
Hasse Olsson says:
Good work. Yes, had a water leak in the garage, including from a position light. Repair and replacement went on tightness guarantee.
11 August 2025 - 0:08
Helena says:
Yes, a lot of work was done 😉 Glad that your leak went on the warranty!
11 August 2025 - 6:47
Anta Snaque says:
Thank goodness for handy men (people)! They are worth their weight in gold and should be fully appreciated and pampered a little extra. Even my late father was such a person who could and did fix everything.
After your struggle with the water leak, I hope that your continued journey will be completely free of problems. From now on just "smooth sailing".
(Smiled at the "misprinter" who got the idea that Peter was in the brewing business. But okay, even there are drops.)😄
Have fun!
11 August 2025 - 0:22
Helena says:
But haha, what a funny typo! I've corrected now... thanks for seeing it! 🙂
11 August 2025 - 6:48
Solan says:
Yes gosh, our car has been incontinent several times. Shower floor, water pump, taps etc. We are unhandy and many a workshop we have kept going over the years.
👍 Peter is m a o unworthy. And in addition, what an educational approach with text, image and tips. Maybe time to make a "Handyman Freedom? I think many would pay well for it. Locked online edition until you swish the sum.
Hope for drier times for you...😊
11 August 2025 - 8:48
Helena says:
"Incontinent" ... haha, yes that's how you can put it! Not so funny when it happens though ... And YES it is priceless that Peter is so handy! THANK YOU also for your nice comment about the text! 🙂 And for the tips! 🙂 Wishes all the best!
11 August 2025 - 20:14
Ditte says:
Wow! What a huge job to both find the error and to fix it. Being handy and practical and stubborn are good qualities. in many contexts. Have never had a motorhome but well sailboats and probably there have been various water leaks. And very tricky to find the leak. But the husband is handy so he has found the leaks and fixed them. But it has taken time.
I hope that your leak is now stopped and you don't have to worry any more.
11 August 2025 - 12:09
Helena says:
I can imagine that there are similar challenges in sailboats! So nice that your husband is also handy, it is very practical in these contexts! 🙂
11 August 2025 - 20:15
Lena - gott för själen says:
But my goodness! What a monster job! I imagine there were a lot of bad words flying around there for a while, hehe. Impressive that the error was found and fixed in the end. Invaluable to be able to fix things like that "on the fly" and in heat as well.
Hug Lena
23 October 2025 - 18:10